Vesting Settings
The Vesting Settings section allows administrators to create, manage, and monitor token vesting schedules. It provides full control over batch allocations, recipient configuration, cliffs, and claimable amounts.
Overview of the Vesting Settings
Administrators can:
- Create vesting batches with defined recipients and custom token allocations
- Set vesting periods, start and end dates, and distribution frequencies
- Apply optional cliff periods with flexible timing options
- Add recipients individually or import bulk allocations via CSV
- Track progress of each batch
- Manage schedules with contract-level and individual batch actions
- Execute emergency controls including withdrawals, revocations, and contract pauses
This ensures long-term token distribution is transparent, predictable, and aligned with ecosystem growth while providing administrative flexibility for changing project requirements.
Vesting Schedules List
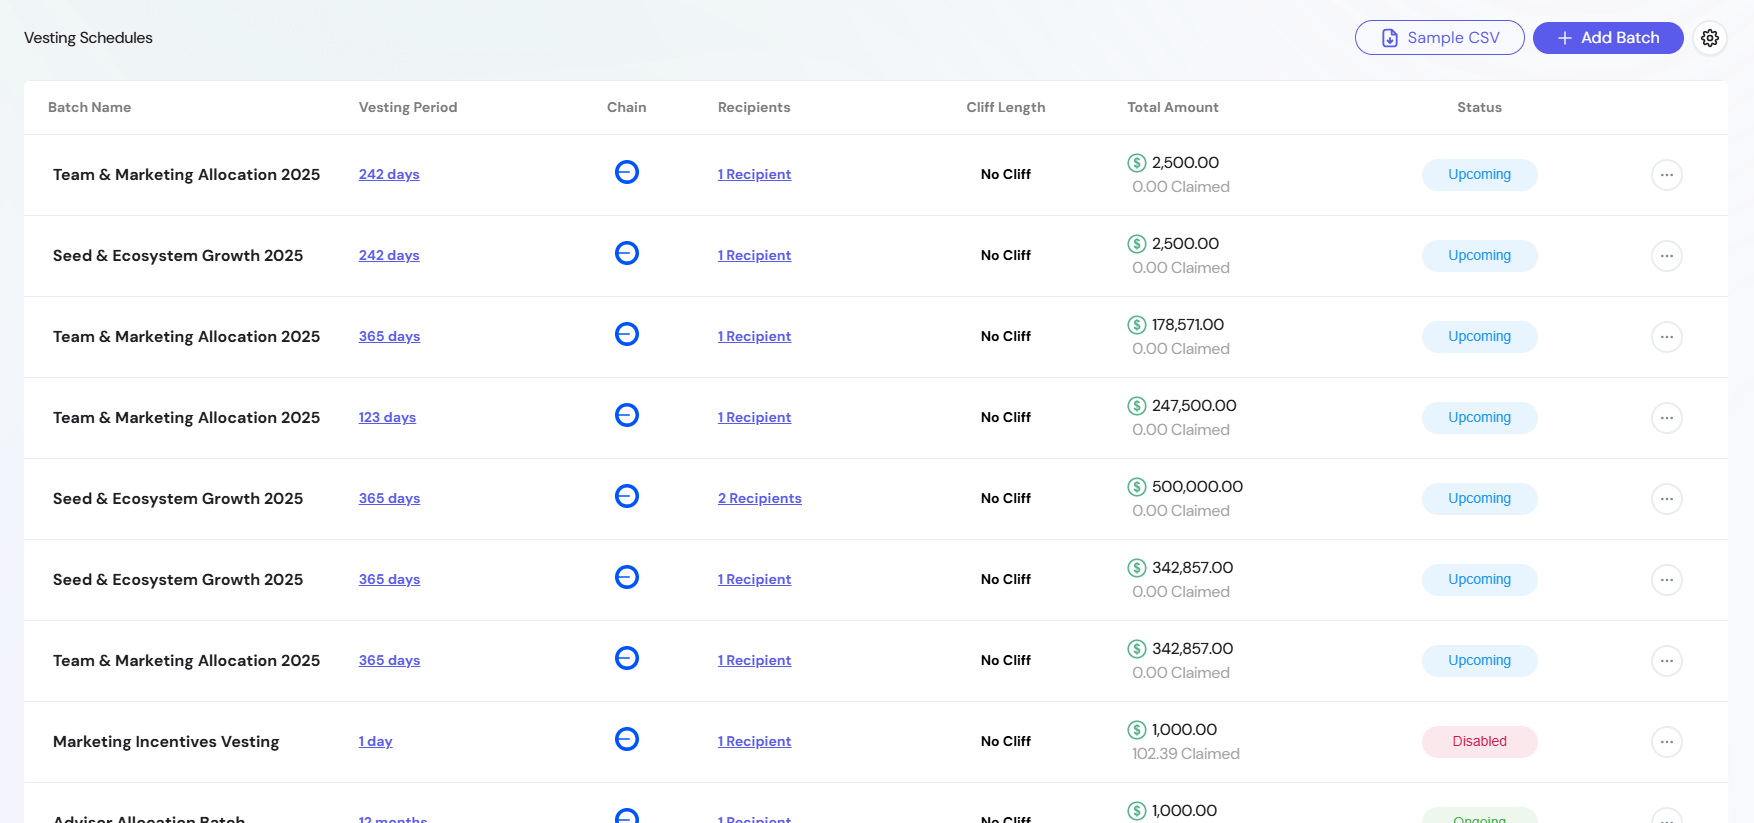
The schedules table provides a snapshot of all configured vesting batches.

- Batch Name — Human-readable label for the allocation.
- Vesting Period – Duration of the token release schedule (shown as a clickable link)
The format (seconds, days, weeks, or months) depends on the chosen distribution frequency when the batch is created.

- Chain — Blockchain network where vesting occurs (indicated by network logo).
- Recipients — Number of participants in the vesting batch (clickable to view recipient details).
- Cliff Length — Initial lock period before vesting starts (shows "No Cliff" if none configured).
- Total Amount — Total tokens allocated, with claimed and unclaimed amounts indicated.
- Status — Indicates lifecycle state (Upcoming, Ongoing, Disabled).
Creating a Vesting Batch
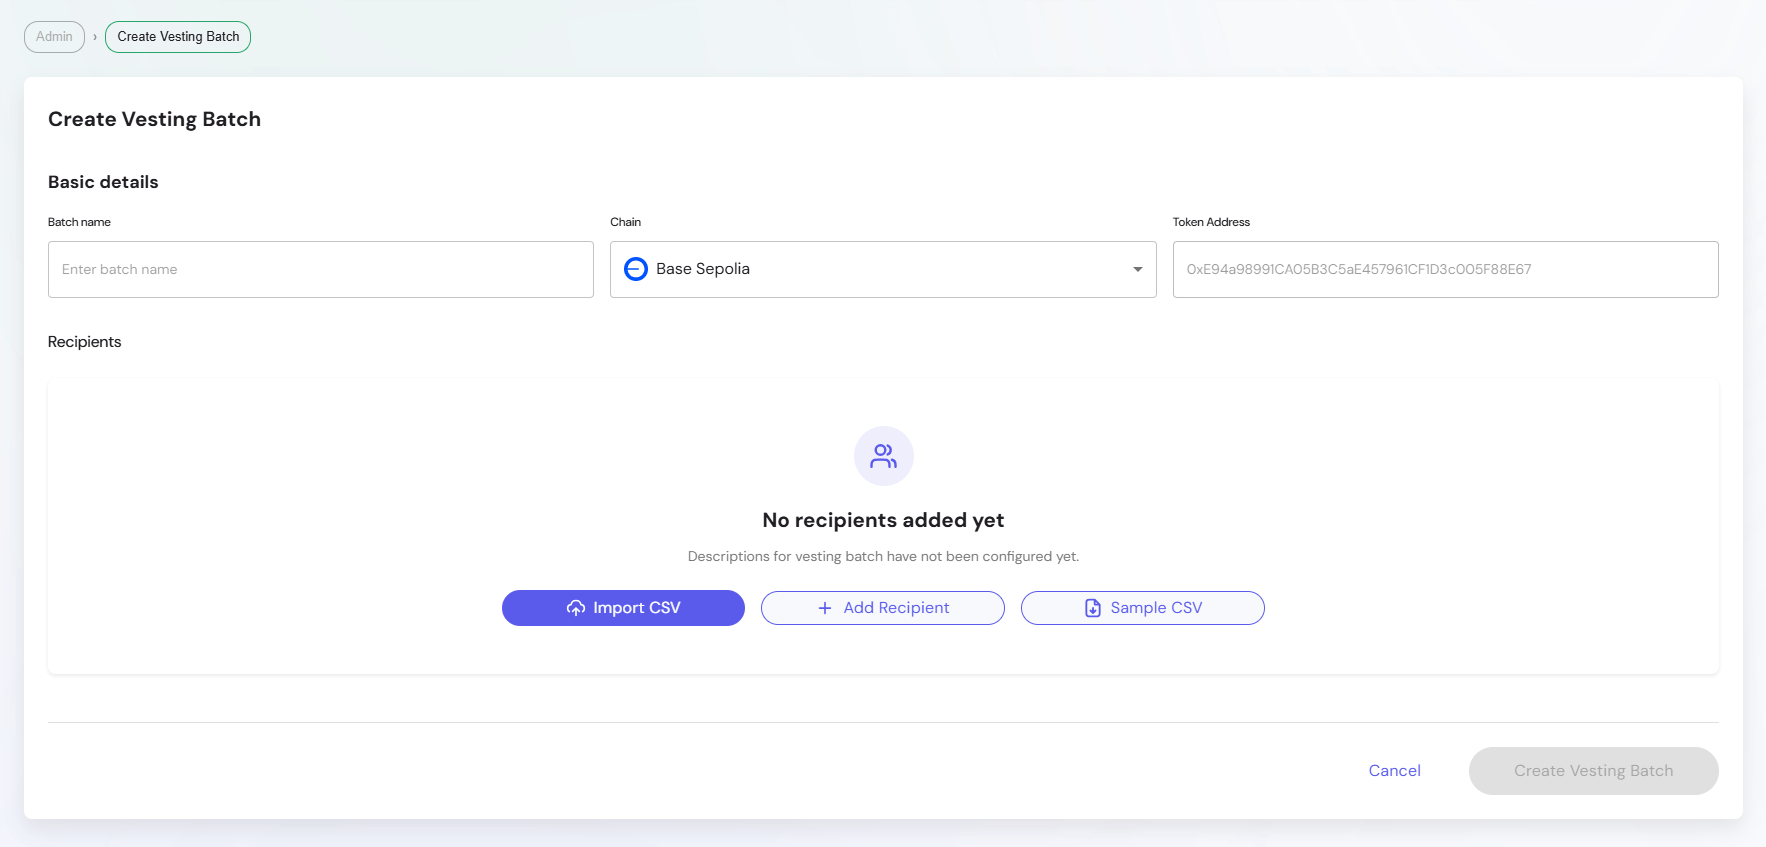
To create a new vesting batch:
1. Basic Details
- Batch Name — Descriptive label for the allocation.
- Chain — Select the blockchain (e.g., Base Sepolia).
- Token Address — Smart contract address of the token being distributed (pre-configured by project administrators during vesting setup).
2. Recipients

Admins can add recipients in three ways:
- Import CSV — Upload bulk allocations via CSV file.
- Add Recipient — Manually input recipient details.
- Sample CSV — Download a template for quick setup.
3. Add Recipient Fields
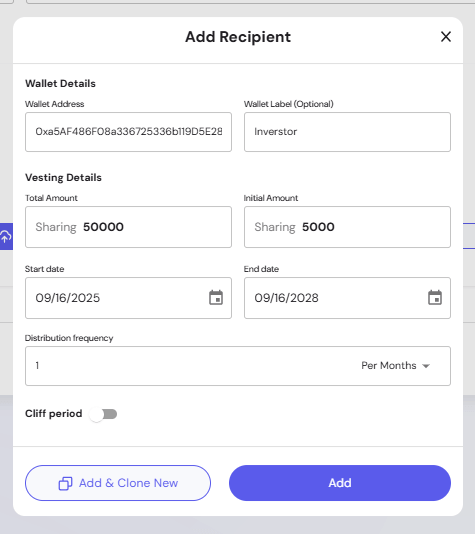
When adding manually, each recipient requires:
- Wallet Address — EVM-compatible address.
- Wallet Label — Human-readable identifier.
- Total Amount — Overall allocation.
- Initial Amount — Tokens that become available at the vesting start date. These are released upfront (if any), before the remaining allocation follows the vesting schedule.
- Start Date / End Date — Defines vesting duration.
- Distribution Frequency — Interval of token release.

- Cliff Period (optional) — Initial lock period that prevents token access until a specified date.

- Cliff Time — Choose when the cliff period ends
Vesting Start Options:
- Cliff Time — Vesting starts only after cliff period ends, only initial amount available at cliff completion
- Start Date — Vesting begins immediately, tokens accumulate during cliff period and become claimable when cliff ends
Managing Batches
Contract-Level Actions

Actions available above the vesting schedules table:
- Sample CSV — Download a template for bulk recipient setup
- Add Batch — Create a new vesting schedule
- Request Withdraw — Initiates a withdrawal request for the contract. This blockchain transaction starts the withdrawal process and sets a mandatory 30-day waiting period before funds can be released. The 30-day delay ensures a safeguard in emergency situations.

- Withdraw — Can be executed only after the 30-day waiting period following a withdrawal request. This action transfers the requested funds from the vesting contract and finalizes the release.
- Pause Contract — Temporarily halt vesting activity
Individual Batch Actions

Each batch has lifecycle controls available from the row action menu:
-
Set Invalid Batch — Mark a whole batch as invalid so that no further amounts can be released. The batch can be validated again later if needed.
-
Revoke Schedule — Cancel a specific vesting schedule so that no further amounts can be released. This action is permanent and cannot be undone.

- Release — Trigger distribution of claimable tokens

Batch Status Types
The interface displays different status indicators:
- Upcoming — Vesting schedule not yet started
- Ongoing — Currently active vesting distribution
- Disabled — Batch marked as invalid or paused
